HomeKit home automation is great for the homeowner, but not as good for guests or visitors. Here's how to give guests control of all your HomeKit devices - and how to lock them back when they leave.
Sometimes it seems that the Home application was built to be used by one person. And it's very possible that Apple has noticed how there tends to be only one person interested in any family.
But automating your home is meant to benefit everyone in the household, so it's essential to give everyone the ability to control the lights. It is essential to be able to share your devices at home quickly and easily.
You can share this access whether you have finally convinced your partner to try it, or if your children are now quite old, or even if you have a guest coming. There are ways around it if, for example, you just want that guest to be able to open the front door.
However, there are times when you want them to have all the access you do. In this case, you must invite them to check your home and they must accept the invitation.
And you must have established some things in advance.
You won't be surprised to learn that sharing your home is based on everyone who's been upgraded to the latest version of iOS or macOS. If someone uses an older version than you, the invitation may not work.
There are, however, more. Everyone - that is, you and your guests - needs to be connected to iCloud on their device. It must also have an Apple device, this will not work on Android.

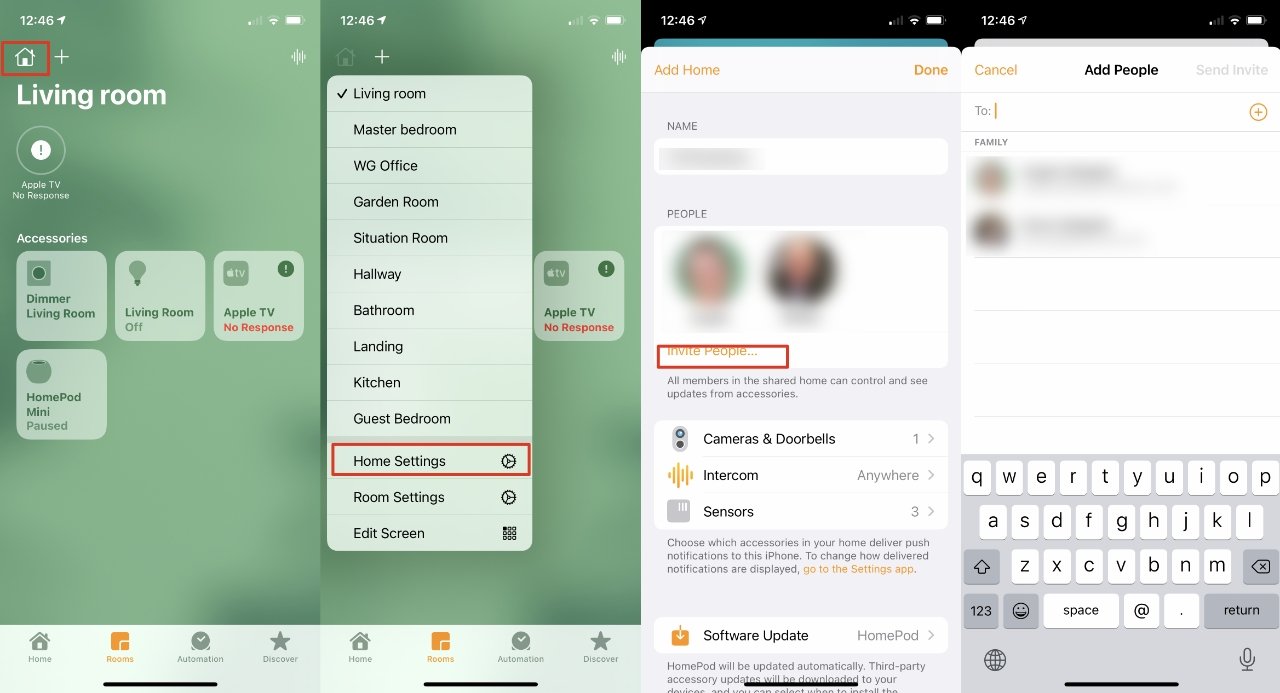
Open the Home app, then LR, choose Home Settings and invite people.
Assuming they do, then on those Apple devices, they have to go to settings. Tap their name at the top, then from the page that appears, tap iCloud. Then they and you must have The home turned on.
That's all you need if you stay home and decide on a guest list. Set everything up like this, then keep inviting people.
However, if you are away from home, you need to do something else. In fact, it's something you must have done before you left.
You need to set up a device as your home hub. With a HomePod, HomePod mini, Apple TV or iPad, configured as a home hub, you can control your home remotely. And you can invite people from wherever you are.
There are several things you can do, but this is necessary to share your home. Send an invitation and then wait for a response.
Interestingly, there is a small difference between Mac and iOS devices here. On iOS, when you go to invite people, you can type an address, but you can also use the + icon that you can tap to see all your contacts. On a Mac, you do not receive that icon.

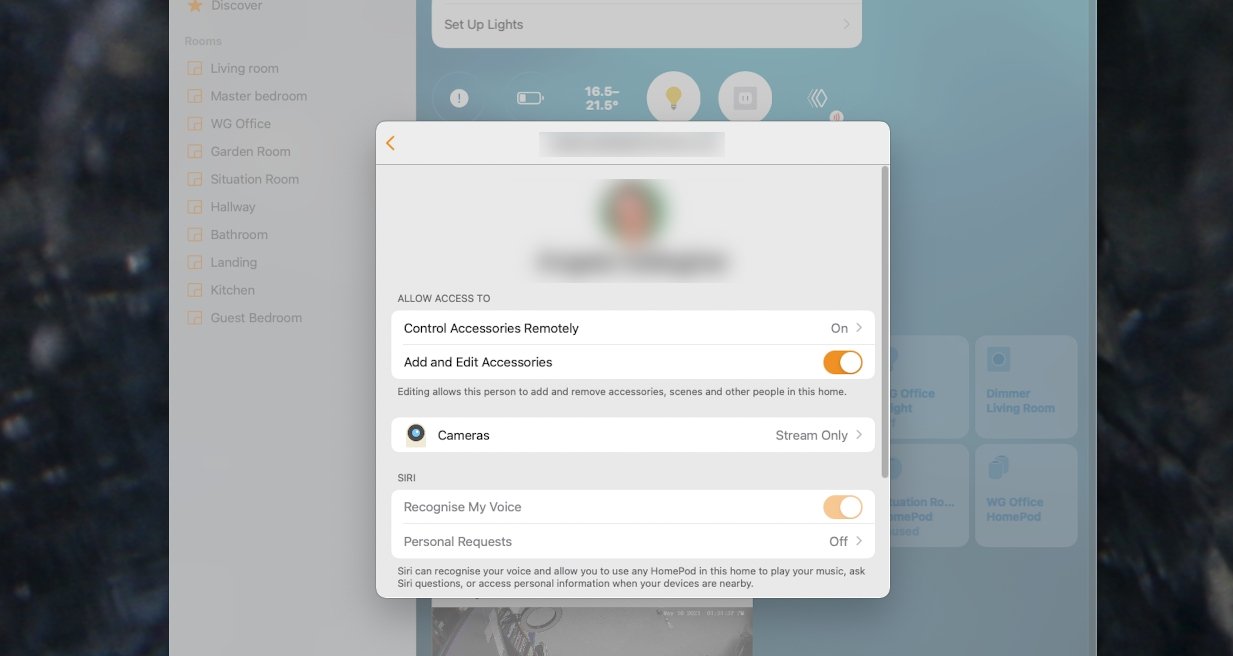
You have some control over what a guest can do
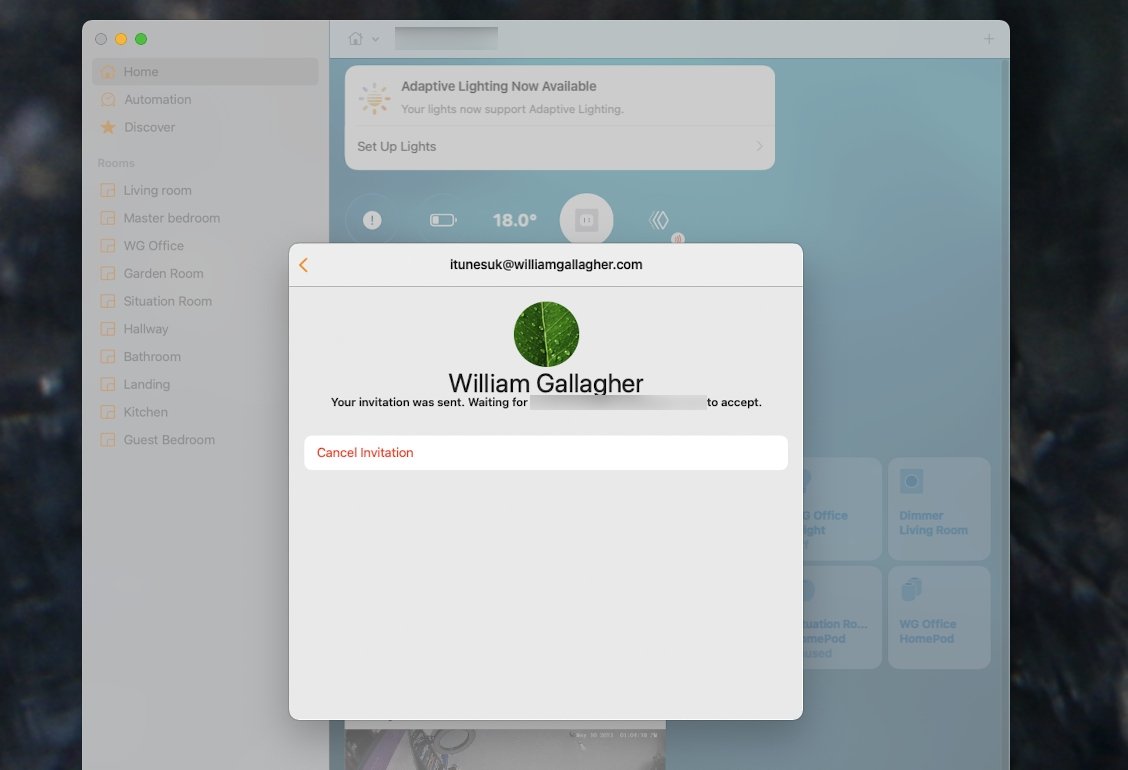
Whether you tap or type, you can enter multiple email addresses during this time, and therefore you can send invitations to multiple people at once. While you wait for them to respond, they are listed in Home settings the "waiting invitation" panel written under their name.
This applies to the device from which you invited them, as well as to all other devices. Until they accept, however, the "pending invitation" does not appear on someone else's device that is already in your home.
So, you might get rid of the surprise party planning, just for a while.
Into the Home settings , scroll to the bottom. Under all Home settings and above Remove Home, there is a section for Notes from home.
Apple says that here you can "add notes for people who share your home." For example, if you set all exterior lights to be part of the ground floor group, you could tell everyone that here.
This is just a scratchpad for notes, not automatically sent to your guests. Which means you can invite everyone and then write them down afterwards.
Honestly, you'll need to tell them these things verbally, too, unless you're checking their Home app. But at least it's an auxiliary memory for you.
When someone accepts your invitation, you see that they did so because the text "Pending invitation" disappears. From now on, this person appears on the Home settings screen of your Home application in the same way as you.
What I see is that your home is now listed in the Home app, along with all your devices. You still have other controls, you can limit what anyone can do.

Guests can leave or you can throw them away
The types of options you have here are related to security cameras, such as whether they can view the cameras or play back recordings. You can allow them to add or edit accessories.
If you invited the wrong person, if you decide you were wrong about that person, or if they just leave, you can cancel the distribution. Likewise, if they never want to darken your doorstep, they can decline the invitation or withdraw later.
To cancel a sent invitation that has not yet been accepted, do so. Go home, Home settings, click or tap their names, then choose Cancel the invitation.
There is no confirmation request or "Are you sure?" message, they disappeared instantly.
When they have already accepted the invitation, the process is about the same. In addition to this date, click or tap its name to display home sharing options, then if you scroll to the bottom, there's a Remove the person button.
There is no way to allow, say, full access for a week. But you stay in charge and you can choose when the party ends, so to speak.
Stay up to date with all Apple news right from your HomePod. Say "Hey, Siri, play AppleInsider" and you'll receive the latest AppleInsider Podcast. Or ask your HomePod mini for "AppleInsider Daily" and you'll hear a quick update directly from our news team. And if you're interested in Apple-centered home automation, say "Hey, Siri, play HomeKit Insider" and you'll be listening to the latest podcast in a few moments.
HomeKit.Blog is in no way affiliated with or endorsed by Apple Inc. or Apple related subsidiaries.
All images, videos and logos are the copyright of the respective rights holders, and this website does not claim ownership or copyright of the aforementioned.
All information about products mentioned on this site has been collected in good faith. However, the information relating to them, may not be 100% accurate, as we only rely on the information we are able to gather from the companies themselves or the resellers who stock these products, and therefore cannot be held responsible for any inaccuracies arising from the aforementioned sources, or any subsequent changes that are made that we have not been made aware of.
HomeKit.Blog Is A Participant In The Amazon Services LLC Associates Program, An Affiliate Advertising Program Designed To Provide A Means For Sites To Earn Advertising Fees By Advertising And Linking To Amazon Store (Amazon.com, Or Endless.com, MYHABIT.com, SmallParts.com, Or AmazonWireless.com).
The opinions expressed on this website by our contributors do not necessarily represent the views of the website owners.