# Introduction
So, I worked on perfecting my Hue automation, which lights my lights and notifies me of an event. For my personal use, I wanted all my (indoor) lights to flash when my favorite streamers start live on Twitch. I would have different colors for different streamers.
There are a few hurdles to overcome, but advanced home automation (converted to shortcuts) and Hue's API have made it all achievable. This is long since it is meant to be a very detailed guide so that anyone can do it alone, so stay with me if you want to do it and don't feel free to degrade if you are only a little interested: )
Note: Unfortunately, Apple does not have a nice sharing feature for shortcuts at home, just as it does for regular shortcuts. I think there might be a way to get to it, but unfortunately I can't just share this order with everyone, so I wrote this guide instead!
# Why the API?
The big question. So, if you try to make the lights flash only through HomeKit, you will inevitably run into the same wall that I did. And this will allow you to light up to flash, but you cannot save the state to return them after they have finished blinking. This either leaves you in the dark or with more lights on than you would like. The API is how we bypass this deficiency of the HomeKit controls we get. There are also a lot of great features built into the API.
# Configuring the API
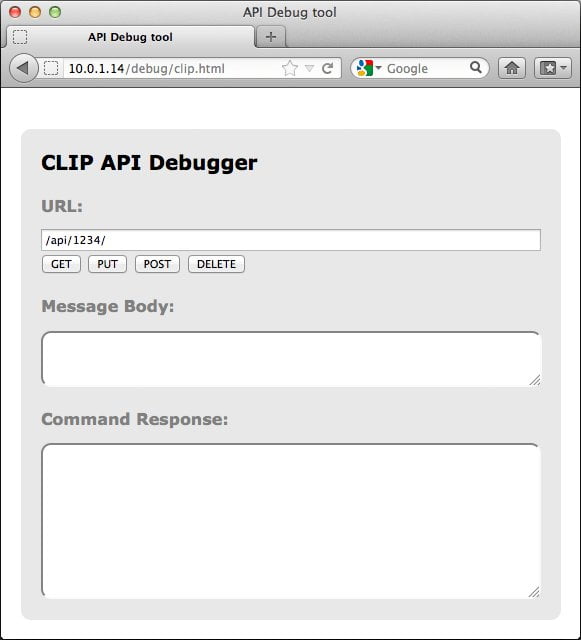
In the interests of not going crazy over here, you will need to follow (these instructions) (https://developers.meethue.com/develop/get-started-2/) to launch with the Hue API. I recommend using Get URLs in the Shortcuts application, instead of the troubleshooting tool they link to, it looks like their tool is broken. Once you've set up, you'll be ready to start playing with some of the action. Also a good note: use http and not https.
# Wouldn't it be difficult to make a flash animation?
In fact, it's pretty simple. Hue's API has a function called "alert" that creates very good intermittent animation for you. The animation takes about 10 seconds, but we can shorten it so that it is not excessive. Here's how the call looks to start blinking:
Get the content of the URL
http: //
Method
PUT
Request body (JSON)
on - True (Boolean)
alert - lselect (Text)
shade - 43690 (number)
village - 254 (number)
bri - 254 (number)
transition time - 0 (number)
It is worth mentioning here, for `groups` we select 0, which is a default group that contains all the bulbs in the Hub. If you want to make a subset, you'll want to create your own group or area through the app, find the ID through the API, and then use that ID in the call. `Alert` is the magic part that blinks for us,` select` flashes only once, `lselect` continues to operate for 10 seconds or until canceled, & # 39; none & # 39; does not cancel any blinking that happens. `hue` is color,` sat` is saturation, `bri` is brightness. Here, the color is blue and saturation and brightness are limited. "Transition time" is the time needed to fade. It might be worth looking for a setting better than 0, it seems a little jumpy.
All of these parameters are optional, so feel free to adjust as needed. However, there are some interesting aspects. Like, "alert" will work in the off lights, but changing the hue, "village" and "breeze" will not. I turn on the lights for these changes to take effect.
# Okay, it's cool and everything, but after that, my lights are left and blue ...
This is where the API usage really pays off. To solve this problem, we will first want to save the state of all our lights, so that we can reinstall them after we are finished. To do this, we simply save a temporary scene in our center. Fortunately API, let's use to save the states of an entire group simultaneously:
Get the content of the URL
http: //
Method
POST
Request body (JSON)
name - Whatever you want (text)
type - GroupScene (Text)
group - 0 (text)
recycle - True (boolean)
Here again, we use `group` of 0. As above, you can use any group you want, but it should match the group you used in the first part. `name` can be whatever you want, you won't use this scene otherwise, so it doesn't really matter. `Type` must be` GroupScene` to use the `group` parameter. Believe me, you don't want to save them individually. And "recycle" must be "true". This will create a scene each time the automation is executed. Recycling says the hub is sunk. If this is set to false, you will keep a lot of unpleasant scenes, and your hub will not be very happy with you as it fills up and will no longer be able to hold scenes.
In response, we will receive a unique ID returned for the scene:
{"Succes": {"id": "ajwdflkjadlkfjakjlkj"}}
You will want to save the scene reinstall id after the blinking is complete. To do this, you will want to do this:
<Get a dictionary from
<Get
<Get
This will give you the id of the scene to be referred to later.
# How do I activate that scene though?
Okay, so now, when we saved the scene and identified the reference to it, we just have to re-enter the scene. Fortunately, this is probably the easiest call you will make in this guide. Here is:
Get the content of the URL
http: //
Method
PUT
Request body (JSON)
scene - ajwdflkjadlkfjakjlkj (Text)
alert - none (Text)
Again, we use the same group as above. Here we only need two parameters, one is the value we just saved to set the scene, the other is to stop the flashing. The scene ID can be saved in a variable with "Variable Set" and use "Get Variable" to access it. Or you can use magic variables to access it.
# Cold. How can I put all this together?
That's great. Now just take these parts and put them in a single Convert to Shortcut automation. The flow will go this way:
1. Call the end point "scenes" to save the current state of your lights. Make sure you get and save the scene id
2. Start the color change and blink by pressing the end point `groups / 0 / action with the parameter` alert` set to `lselect`
3. Use the wait command to wait a few seconds
4. Kill the flashing and restore the initial state with another call to `groups / 0 / action`, this time with the scene id from (1) and` alert` set to `none`
That's it! Now you can dream of a number of different ways to use this. I personally have a few IFTTT switches set up with HomeBridge with which I can create pretty great automations. That's how I turn on the flash when someone goes live on Twitch.
Anyway, thank you for following! Please let us know if this has helped you, if you have questions or have other interesting ideas for automation integrations!
 eufy Security, eufyCam 2C 3-Cam Kit, Wireless Home Security System with 180-Day Battery Life, 1080p HD, IP67, Night Vision, No Monthly Fee (Renewed)
$179.99
 Aqara Door and Window Sensor Plus Aqara Vibration Sensor, REQUIRES AQARA HUB, Zigbee Connection, For Remote Monitoring, Alarm System and Smart Home Automation
Original price was: $37.98.$34.99Current price is: $34.99.
 Lutron Caseta Smart Lighting Dimmer Switch and Remote Kit | P-PKG1W-WH | White
Original price was: $69.99.$53.99Current price is: $53.99.
 Govee Permanent Outdoor Lights, Smart RGBIC Outdoor Lights with 75 Scene Modes, 50ft with 36 LED Eaves Lights IP67 Waterproof for Christmas Decorations, New Year, Work with Alexa, Google Assistant
$199.99
HomeKit.Blog is in no way affiliated with or endorsed by Apple Inc. or Apple related subsidiaries.
All images, videos and logos are the copyright of the respective rights holders, and this website does not claim ownership or copyright of the aforementioned.
All information about products mentioned on this site has been collected in good faith. However, the information relating to them, may not be 100% accurate, as we only rely on the information we are able to gather from the companies themselves or the resellers who stock these products, and therefore cannot be held responsible for any inaccuracies arising from the aforementioned sources, or any subsequent changes that are made that we have not been made aware of.
HomeKit.Blog Is A Participant In The Amazon Services LLC Associates Program, An Affiliate Advertising Program Designed To Provide A Means For Sites To Earn Advertising Fees By Advertising And Linking To Amazon Store (Amazon.com, Or Endless.com, MYHABIT.com, SmallParts.com, Or AmazonWireless.com).
The opinions expressed on this website by our contributors do not necessarily represent the views of the website owners.