Over the past few months, I've approached several projects in an effort to set my HomeKit configuration to the next level in time for the summer. This includes a smart sprinkler system, new smart outdoor lighting, a robotic robot with Siri support and more. Read on as I go through the entire process below.
Smart outdoor lights
For the first time on my list for this summer I added some new home lighting with HomeKit integration. There are a variety of different options here, but as I wrote, I delve into the Philips Hue ecosystem and I like to stay there when possible.
My first additions were the Philips Hue Outdoor headlights. I replaced all five of my bulbs with these smart bulbs to add additional automation features. There are a few different automation options here. In the front yard, I keep the flooded lights from sunset to sunrise, which is an automation you can set up through the Home app.


In the yard, I usually keep the headlights flooded, unless we (or the dogs) are in the yard. There are two ways to achieve automation for this situation. A Philips Hue outdoor motion sensor is a choice, but I've had issues with this sensor and things like bugs trigger it automatically. In the Home app, I set it so that when the back is opened, a state monitored via the Ecobee Door sensor, the headlights in the yard turn on if it's between 20 p.m. and 8 p.m.
For accentuated lighting on the back porch, we added a Philips Hue Outdoor Lightstrip, mounted along the top edge of the ceiling. This is primarily for aesthetic purposes, but provides additional light to the outside when needed. Philips Hue offers a variety of different outdoor lighting solutions and you can find out more in our full review here.
Eve grad

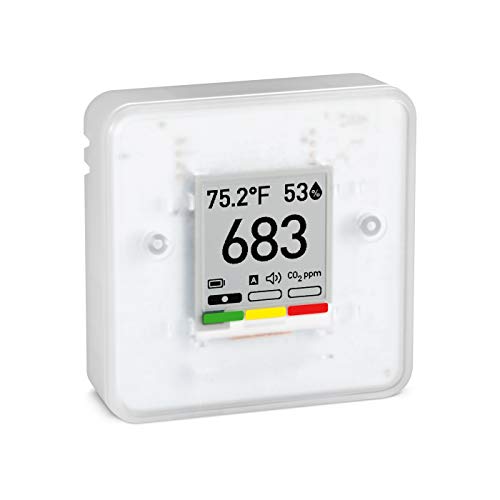
Eve grade is one of my favorite HomeKit accessories; is a simple device that you can place indoors or outdoors to monitor the hyperlocal climate. I mounted it right outside my front door, so that not only can I monitor the local temperature in the Home app on iOS, but also every time I walk in the front door.
One of the biggest disadvantages is that the Home application does not support the triggering of temperature-based automation. For example, it would be useful if in the Home app you can automate a smart speaker to start when the humidity is below a certain level. Automations like these are, however, possible through the standalone Eve app.
Eve grade, as Bradley Chambers explained last month, is a handy accessory for any HomeKit setup, especially as we head into the summer, and hyperlocal temperatures can become an important data point for people.
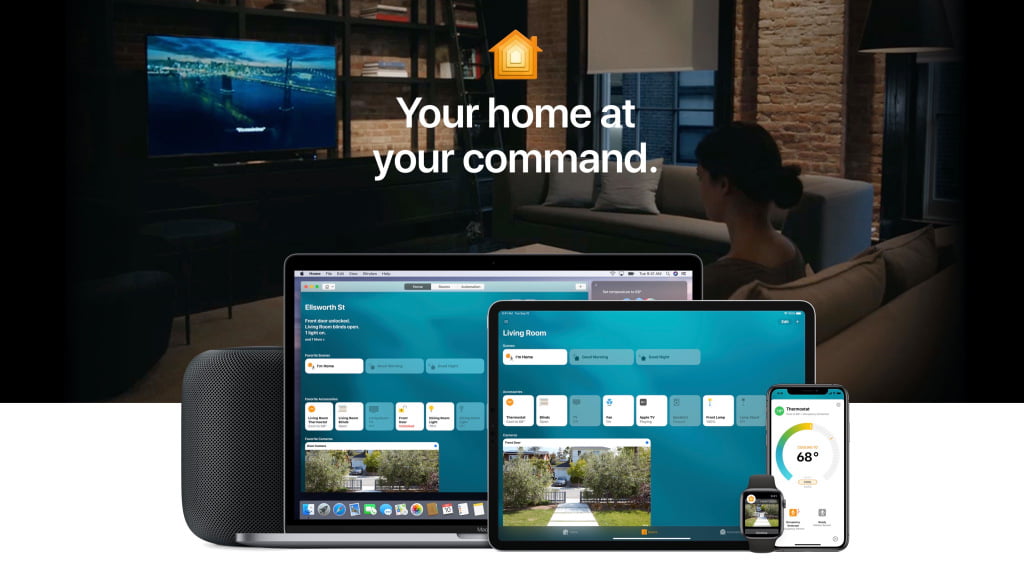
HomeKit thermostat

As the summer heat intensifies, now is a great time to add a smart thermostat to your HomeKit setup. My personal recommendation here is the Ecobee SmartThermostat with voice control (full review). Using a smart thermostat can give you extra control over the heating and cooling of your home and help you become more aware of energy consumption.
Ecobee SmartThermostat is one of the few options that integrates with Alexa, Assistant and HomeKit, and this only makes it a very convincing option for many households. Although I would definitely like to see more competition in the pace of the HomeKit thermostat, Ecobee is the best choice available at the moment.

In combination with SmartThermostat, Ecobee also offers SmartSensors. These SmartSensors are designed to be placed around your home to provide hyperlocal temperatures in different rooms. For example, I have one in the bedroom, so I can make sure it's cooled properly before I go to bed.
Ecobee SmartThermostat with voice control sells for $ 249 on Amazon. If you want to give up new features like glass design, the Ecobee3 Lite is still a viable option and is more affordable at $ 169.
HomeKit locks

A piece of low hanging fruit for my smart home arrangement was a smart lock. There are a variety of options, but I needed something to be friendly with renting. In essence, it had to fit over the existing blockage and not change the actual blockage with the outside.
I decided to go with two different options for my front and back door: August Smart Lock Pro and Friday Lock. Frustratingly, I got my August lock just weeks before the introduction of the new Smart August Wi-Fi lock, which has built-in Wi-Fi support and a significantly smaller design.


In terms of installation, the process is very similar for Friday Lock and August Smart Lock Pro. They fit over your existing block and you only need a screwdriver to attach the mounting plate. Once you've installed the locks, complete the setup with the respective Friday and August apps for iOS, and possibly add them to the Home app.
In practice, the August Smart Lock Pro was more reliable than the Friday Lock. Friday lock tends to have an "Don't Answer" issue in the Home app, while I've never encountered this issue with August Smart Lock Pro.
For someone who has entered the smart lock ecosystem today, I would recommend the new August Lock Wi-Fi Smart Lock, which has built-in Wi-Fi and a smaller design than its predecessor. Friday Lock, although sleek and well designed, simply turned out to be too insecure in my testing. There is also the Blocking Level, which Jeff Benjamin continued earlier this month.
HomeKit garage door

In a similar vein to HomeKit locks, adding HomeKit features to my garage door was another low-suspension project. To do this, I simply added MyQ Home Bridge to my garage, which matches my LiftMaster garage door opener.
- Add HomeKit compatibility to these products that are already enabled with your smartphone control:
- LiftMaster and Chamberlain Wi-Fi garage door openings (has myQ and Wi-Fi logo)
- LiftMaster and Chamberlain myQ Garage
- LiftMaster and Chamberlain myQ Smart Garage Hub
- LiftMaster and Chamberlain Internet Gateway (myQ Home Bridge is a replacement for this device and adds HomeKit compatibility)
- Add both smartphone control and HomeKit compatibility to:
- LiftMaster and Chamberlain compatible garage door openers (have a myQ logo / no Wi-Fi logo)
- LiftMaster MyQ control panel (model 888LM)
I placed MyQ Home Bridge along the side of my garage - slightly farther from the garage door opener than LiftMaster recommends, but had no problems at all. Then simply plug it in and follow the setup instructions in the MyQ app for iOS. After pairing MyQ Home Bridge with the garage door, you can add it directly to the Home application for HomeKit control.

You can open, close, and view the status of the garage door in the Home app. You can also include it in automations, but Apple will send you a push notification asking you to confirm the automation before it is completed. This is probably a security setting to prevent the garage door from opening or closing without your knowledge.
For me, the most useful feature is monitoring the condition of the garage door. It offers extra peace of mind to be able to confirm the garage door is closed every night by checking the Home app or asking Siri. Inclusion in automation is useful, but also complicated by the fact that Apple needs confirmation before running them - although you can include garage doors in night automations.
You can find out more about MyQ Home Bridge in Jeff Benjamin's full review here.
Note: If you don't have a myQ Garage LiftMaster or Chamberlain (with or without Wi-Fi), you'll also need myQ Smart Garage Hub.
Smart sprinklers

I moved from Indiana to Texas a little over a year ago and one thing I learned quickly was that you need to water your lawn regularly, especially during the hot, dry summer. My house came standard with a Rain Bird splash controller for the sprinkler system in the ground, but naturally I saw this as an opportunity to add HomeKit features to another part of my life.
Only this year I managed to make the transition from the Rain Bird controller to the Rachio Smart Sprinkler Controller. My fear when I made this switch was the installation process, but in practice, it was much easier than I expected. If you have ever installed a smart thermostat, the Rachio installation process is similar, with only a few extra wires.
I took several pictures of how the Rain Bird controller was installed so that I could adapt the wiring to the correct areas on the Rachio controller. All in all, it was a pretty simple process and I say that as someone who is not very good at home improvement projects.
After installing the actual hardware, the Rachio setup process is managed through the accompanying iOS app and possibly through the Home app. You identify the different spray areas, name them, and Rachio will suggest different water programs and timers.
For me, the usefulness of Rachio Smart Sprinkler is that it is a "set-it and forget it" solution for lawn care and maintenance. I'm not an expert on lawn maintenance, especially in Texas, and Rachio takes care of most of me. The Rachio app monitors the weather in your area and adjusts your watering schedule to your needs.
For example, if it rains in your area, the Rachio app will automatically skip the scheduled watering cycle if necessary. It will also skip water cycles if there is wind outside or if it is below a certain temperature. It also gives you tips on what changes you need to make to your watering program throughout the year. For example, once things started to become very hot outside, Rachio recommended that I extend the watering time by a few minutes. These are the kinds of adjustments I wouldn't think of making on my own - and I wouldn't want to worry about them either.

Rachio's HomeKit integration leaves something to be desired, but the limitations here are due to HomeKit itself. The Home application does not simply provide all the features needed to manage a sprinkler system. Through the Home app, you can do the following with your Rachio Smart Sprinkler Controller:
- View all watering areas and conditions
- Run the zones through the Home interface or through Siri
- Enable or disable an area
- Queue and roll several areas
- Set a custom duration for each zone
- Use Siri to start or end watering sessions
I like the ability to quickly use the Home app as a way to check when my sprinkler system is working, but other than that, the Rachio app is more useful for management and automation.
Rachio Smart Sprinkler Controller is available in 8-zone and 16-zone variants, depending on the size of your yard and the number of sprinkler heads you have. Rachio also offers the Rachio Thrive subscription package.
If you do not have a sprinkler system, there are other options for HomeKit water management. Eve Aqua is another accessory that I highly recommend. It is a water controller capable of HomeKit that also controls the sprinkler, hose or irrigation system.
HomeKit + AirPlay 2 TV

I recently made two other smart home upgrades that I wanted to mention quickly. First, I upgraded my 55-inch Vizio M series desktop TV with HomeKit and AirPlay 2 support. This is my first experience with a HomeKit and AirPlay 2 compatible TV since Apple launched support for last year. .
In practice, I've realized that if you're already an Apple TV user, adding HomeKit (and obviously AirPlay 2) isn't necessarily helpful. Get additional features, such as volume and input controls, but the primary functionality is already supported via Apple TV itself.
That being said, if you're not an Apple TV user, HomeKit and AirPlay 2 integration are much more useful. For example, you can stream content directly from your iPhone or iPad to the Vizio M series without the need for an additional Apple TV box. In the Home app, you can turn the Vizio M series on and off, switch inputs, and include it in automations.
For many people, pairing an AirPlay 2 compatible TV with something like the Amazon Fire TV Stick might be the best solution. You can avoid the high price of the Apple TV, while you can also stream content via AirPlay 2 and access controls via the Home app.
Vacuum robot Neato

Secondly, we entered the world of smart vacuum cleaners with the Neato D7 Connected robot vacuum cleaner. The Neato app offers a variety of smart features for the home, including Alexa integration and the ability to program the vacuum so that it works at certain times of the day. You can even set "No Go Line" to prevent Neato from vacuuming certain areas.
For Apple users, the key feature here is integration with Siri shortcuts. As I covered until 9to5Mac, this means that you can create custom voice commands through the Shortcuts application to control your Neato D7. For example, I can say "Hey Siri, run the vacuum cleaner" for Neato to start cleaning or "Hey Siri, send the vacuum home" for it to return to the charging base.

You can also include Neato automation in other shortcuts. For example, if you have a shortcut to exit the house, you can add the Neato action so that the vacuum works while you're gone and it's done until you get home.
I'm new to robot madness, but I thought the Neato D7 was incredibly useful. He created a smart map of my house, so I can easily say it to vacuum certain rooms or areas or the whole house. The "No Go Lines" function is also particularly useful. I have a relatively thick carpet in the living room and I can set up "No Go Lines" so that Neato avoids the carpet and doesn't get stuck on it.
Interestingly, there is also support for adding Neato D7 to the HomeKit using the Homebridge platform. I haven't tried this yet, but it's on my list of projects. More on that soon, but needless to say, I'm intrigued.
What recent changes did you make to your HomeKit setup? Do you have any plans for further improvements or changes this summer? Tell us in the comments!
Also, don't forget to consult Weekly HomeKit, a 9to5Mac weekly series focused on smart home accessories, automation tips and tricks and everything to do with Apple's smart home frame.
FTC: We use car affiliate links that earn revenue. More.
Check out 9to5Mac on YouTube for more Apple news: