How to create automations in the Home application

Cupertino, August 18, 2020

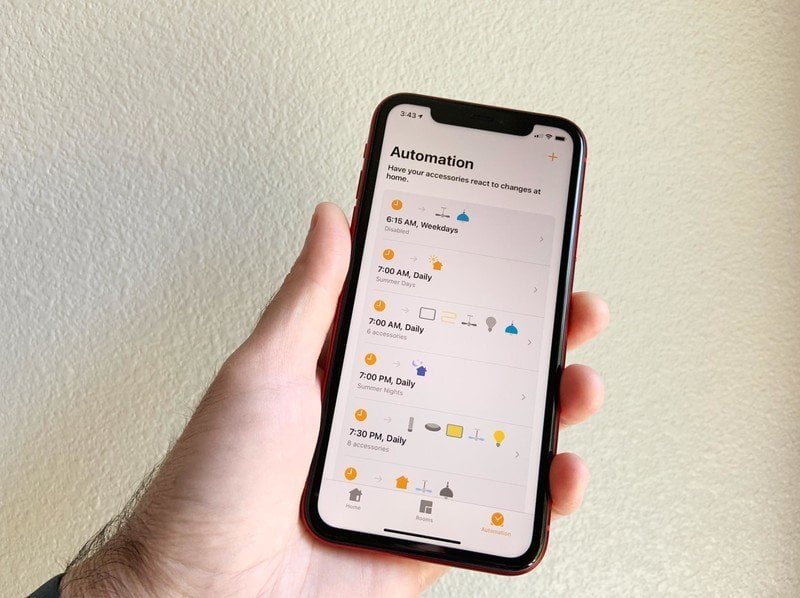
Controlling HomeKit accessories through the Home app or voice through Siri is certainly convenient, but to make your home really smart, you need to know how to create automations. With the Home app, you can set the HomeKit lights to turn on automatically when you open the door at a certain time of day, or even when the HomeKit smoke detector alarm goes out.

It may sound a little daunting at first, but don't worry, it's actually very easy to set up. Here's how to create automations in the Home app.

How to create location automations in the Home app on iOS and iPadOS

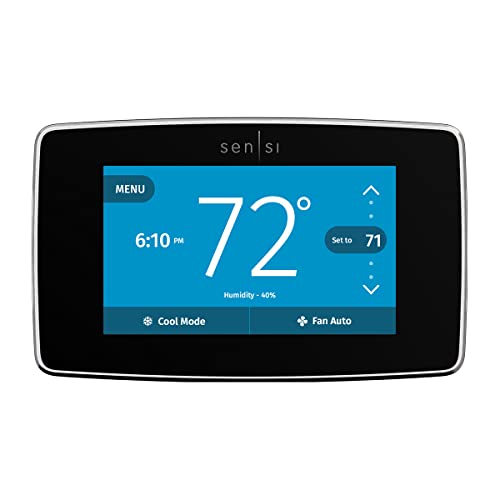
Location-based automation uses GPS and geofencing on the iPhone to determine when to start a series of events. Typically, these automations are used to adjust settings on a HomeKit thermostat or to lock a HomeKit door lock when you go to work, so you never have to worry about the condition of your home when you leave.

Get an iPhone SE with Mint Mobile service for $ 30 / month

Location-based automation isn't just limited to your iPhone, but can be set to work with other people you've invited home. You can also use additional options to run automations only when the first person arrives home for that day, in addition, you can even choose another location completely different from your home.

  1. Launch Home application.
  2. Press Automation.
  3. Click on Add button in the upper right corner of the screen (looks like an extra sign).

    How to create location automations in the Home app on iOS 13 on iPhone, showing steps: Launch the Home app, tap Automation, tap the Add button

    Source: iMore

  4. Touch either People arrive or People are leaving depending on the desired automation.
  5. Select When automation should occur with a tap.
    • Your options will vary depending on whether you select People arrive or People are leaving when creating automation.
    • Click on I button to select whose location will be considered for automation.
  6. touch Location to set a desired location, such as Home or a work address.

    How to create location automations in the Home app on iOS 13 on iPhone, showing steps: Choose Inbox or Outgoing People, Select When you want to start automation, tap Location to set a location geofence, if you want.

    Source: iMore

  7. touch Time to set the time at which automation will be active.
  8. touch Next →.
  9. Choose which Accessory or scenes you would like to control this automation with a tap.

    How to create location automations in the Home app on iOS 13 on iPhone, showing steps: Tap Time to set specific times if you want, tap Next, choose a scene or accessories with a tap

    Source: iMore

  10. touch Next →.
  11. Touch and hold a Accessory to change the target state, such as brightness or off / on, then touch the key X button.
  12. touch Done.
    • touch stop to set an hour for the accessory to turn off automatically if you wish.
      How to create location automations in the Home app on iOS 13 on iPhone, showing steps: Tap Next, tap and hold an accessory to change its status, then tap the X button, tap Done

How to create time automations in the Home app on iOS and iPadOS

Time-based automation is a great way to automatically control your home during the day. The Home app simplifies turning HomeKit bulbs out at preset times such as sunset or at specific times, such as 8:15 P.M. daily. Time-based automation is not just about lights, it works with smart HomeKit plugs, TVs, air conditioners, AirPlay 2 speakers and even sprinkler controllers.

In combination with location and people options, your automations can only be set to work when you're actually at home, which can save you a little dough. The same thing works in reverse, where you can set the lights to turn on at random times when you're not around to make it look like someone is home.

  1. Launch Home application.
  2. Press Automation.
  3. Click on Add button in the upper right corner of the screen (looks like an extra sign).

    How to create time automations in the Home app on iOS 13 on iPhone, showing steps: Launch the Home app, tap Automation, tap the Add icon

    Source: iMore

  4. Choose An hour of the day takes place with a tap.
  5. Touch a Default time as the sunrise or forms a At some point.
  6. Select Specific days that you want the automation to work by pressing one day of the week in the repeat section.

    How to create time automations in the Home app on iOS 13 on iPhone, showing steps: Tap An hour of the day appears, choose a preset or set a specific time, tap the Days you want to run the automation

    Source: iMore

  7. touch people to have automation working when certain people are at home or away.
  8. touch Next →.
  9. Choose which Accessory or scenes you would like to control with this automation.

    How to create time automations in the Home app on iOS 13 on iPhone, showing steps: Tap People to select who is considering automation, tap Next, choose a scene or accessories

    Source: iMore

  10. touch Next →.
  11. Touch and hold a Accessory to change the target state, such as brightness or on / off, then touch the key X button.
  12. touch Done.
    • touch stop to set an hour for the accessory to turn off automatically if desired.
      How to create time automations in the Home app on iOS 13 on iPhone, showing steps: Tap Next, tap and hold an accessory to change its status, tap Done

How to create accessory automations in the Home app on iOS and iPadOS

Accessory-based automations are set in motion when a particular device, such as a light, experiences a change. For example, you can create an automation that automatically shuts off a HomeKit ceiling fan in the living room when the lights go out.

But the best part is that these automations will work even if an accessory is changed by means of a physical switch on the wall, it is not limited to the periods when the Home or Siri application is used.

  1. Launch Home application.
  2. Press Automation.
  3. Click on Add button in the upper right corner of the screen (looks like an extra sign).

    How to create accessory automations in the Home app on iOS 13 on iPhone, showing steps: Launch the Home app, tap Automation, tap the Add button

    Source: iMore

  4. touch An accessory is controlled.
  5. Select which Accessory the automation will start by pressing each.
  6. touch Next →.

    How to create accessory automations in the Home app on iOS 13 on iPhone, showing steps: Touch an accessory is controlled, choose a scene or accessories, tap Next

    Source: iMore

  7. Choose the desire Accessory state for automation, such as On, with a tap.
  8. touch Time and set the specific times for which you want automation to be active.
  9. touch people to set location-based conditions for the time of automation.

    How to create accessory automations in the Home app on iOS 13 on the iPhone, showing steps: tap a desired accessory status, tap Time to set specific hours for which automation will be active, tap People to select who will consider automation

    Source: iMore

  10. touch Next →.
  11. Touch a Scene or Accessory which you want to control when automation works.
  12. touch Next →.

    How to create accessory automations in the Home app on iOS 13 on iPhone, showing steps: Tap Next, choose a scene or accessories, tap Next

    Source: iMore

  13. Touch and hold a Accessory to change the target state, such as brightness or on / off.
  14. Click on X button when you have set the desired state.
  15. touch Done.
    • touch stop to set an hour for the accessory to turn off automatically if desired.
      How to create accessory automations in the Home app on iOS 13 on the iPhone, showing steps: Touch and hold an accessory, tap the X button after changing the desired status, tap Done

How to create sensor automations in the Home app on iOS and iPadOS

Sensor-based automation, such as accessory automation, comes into play when a change in the environment occurs. Automations can be created with HomeKit devices such as motion sensors, air quality sensors, contact sensors, smoke / co detectors, and more. This means that you can have a bright red when the air quality in the house sinks or when the speaker sounds an alarm when a window opens.

Unfortunately, temperature and humidity sensor automation isn't available through the Home app yet, but if you don't mind taking a deeper dive using a third-party HomeKit app, there are ways to use it.

  1. Launch Home application.
  2. Press Automation.
  3. Click on Add button in the upper right corner of the screen (looks like an extra sign).

    How to create sensor automations in the Home app on iOS 13 on iPhone, showing steps: Launch the Home app, tap Automation, tap the Add button

    Source: iMore

  4. touch A sensor detects something.
  5. Select which Accessory the automation will start by pressing each.
  6. touch Next →.

    How to create sensor automations in the Home app on iOS 13 on iPhone, showing steps: Touch a sensor detects something, choose accessories, tap Next

    Source: iMore

  7. Choose the desire Accessory state for automation, such as On or Open, with a tap.
  8. touch Time and set the specific times for which you want automation to be active.
  9. touch people to set location-based conditions for when automation will run.

    Choose accessory status, tap time to access time-based options, tap People to access location-based options

    Source: iMore

  10. touch Next →.
  11. Touch a Scene or Accessory which you want to control when automation works.
  12. touch Next →.

    How to create sensor automations in the Home app on iOS 13 on iPhone, showing steps: Tap Next, choose a scene or accessories, tap Next

    Source: iMore

  13. Touch and hold a Accessory to change the target state, such as brightness or on / off.
  14. Click on X button when you have set the desired state.
  15. touch Done.
    • touch stop to set an hour for the accessory to turn off automatically if you wish.
      How to create sensor automations in the Home app on iOS 13 on iPhone, showing steps: Tap and hold to change the status of accessories, tap the X button, tap Done

How to create location automations in the Home app on iOS 14 and iPadOS 14

Apple occasionally offers updates for iOS, iPadOS, watchOS, tvOS and macOS as closed developer previews or public versions. While betas contain new features, they also contain pre-release bugs that can prevent normal use of your iPhone, iPad, Apple Watch, Apple TV, or Mac and are not intended for daily use on a primary device. That's why we recommend that you stay away from developer previews, unless you need them for software development and use public betas with caution. If it depends on your devices, wait for the final release.

Location-based automation uses GPS and geofencing on your iPhone to determine when to start a series of events. Typically, these automations are used to adjust settings on a HomeKit thermostat or to lock a HomeKit door lock when you go to work, so you don't have to worry about the condition of your home when you leave.

Location-based automation isn't just limited to your iPhone, but can be set to work with other people you've invited home. You can also use additional options to run automations only when the first person arrives home for that day, in addition, you can even choose another location completely different from your home.

  1. Launch Home application.
  2. Press Automation.
  3. Click on Add button in the upper right corner of the screen (looks like an extra sign).

    How to create location automations in the Home app on iOS 14 on iPhone, showing steps: Launch the Home app, tap Automation, tap the Add button

    Source: iMore

  4. Touch any of these People arrive or People are leaving depending on the desired automation.
  5. Select When automation should occur with a tap.
    • Your options will vary depending on whether you select People arrive or People are leaving when creating automation.
    • Click on I button to select whose location will be considered for automation.
  6. touch Location to set a desired location, such as Home or a work address.

    How to create location automations in the Home app on iOS 14 on iPhone, showing steps: Tap either Arrival or Departure People, Select When automation should occur, tap Location to set the desired location

    Source: iMore

  7. touch Time to set the time at which automation will be active.
  8. touch Next →.
  9. Choose which Accessory or scenes you would like to control this automation with a tap.

    How to create location automations in the Home app on iOS 14 on iPhone, showing steps: Tap Time to set a specific time, Tap Next, Tap a scene, or Accessories

    Source: iMore

  10. touch Next →.
  11. Touch and hold a Accessory to change the target state, such as brightness or off / on, then touch the key X button.
  12. touch Done.
    • touch stop to set an hour for the accessory to turn off automatically if you wish.
      How to create location automations in the Home app on iOS 14 on iPhone, showing steps: Tap Next, tap and hold the accessory, then tap the X button when the desired status is set, tap Done

How to create time automations in the Home app on iOS 14 and iPadOS 14

Apple occasionally offers updates for iOS, iPadOS, watchOS, tvOS and macOS as closed developer previews or public versions. While betas contain new features, they also contain pre-release bugs that can prevent normal use of your iPhone, iPad, Apple Watch, Apple TV, or Mac, and are not intended for daily use on a primary device. That's why we recommend that you stay away from developer previews, unless you need them for software development and use public betas with caution. If it depends on your devices, wait for the final release.

Time-based automation is a great way to automatically control your home during the day. The Home app simplifies turning HomeKit bulbs out at preset times such as sunset or at specific times, such as 8:15 P.M. daily. Time-based automation is not just about lights, it works with smart HomeKit plugs, TVs, air conditioners, AirPlay 2 speakers and even sprinkler controllers.

In combination with location and people options, your automations can only be set to work when you're actually at home, which can save you a little dough. The same thing works in reverse, where you can set the lights to turn on at random times when you're not around to make it look like someone's home.

  1. Launch Home application.
  2. Press Automation.
  3. Click on Add button in the upper right corner of the screen (looks like an extra sign).

    How to set up automation in the Home app on iOS 14 on iPhone, showing steps: Launch the Home app, tap automation, tap the Add button

    Source: iMore

  4. Choose An hour of the day takes place with a tap.
  5. Touch a Default time as the sunrise or forms a At some point.
  6. Select Specific days that you want the automation to work by pressing one day of the week in the repeat section.

    How to set up automation in the Home app on iOS 14 on iPhone, showing steps: Choose When you want the automation to happen, Select a specific time, Select the days you want

    Source: iMore

  7. touch people to have automation working when certain people are at home or away.
  8. touch Next →.
  9. Choose which Accessory or scenes you would like to control with this automation.

    How to set up automation in the Home app on iOS 14 on iPhone, showing steps: Tap People, tap Next, choose accessories or scenes

    Source: iMore

  10. touch Next →.
  11. Touch and hold a Accessory to change the target state, such as brightness or on / off, then touch the key X button.
  12. touch Done.
    • touch stop to set an hour for the accessory to turn off automatically if desired.
      How to set up automation in the Home app on iOS 14 on your iPhone, showing steps: Tap Next, Tap Long Accessory to change settings, Tap Done

How to create accessory automations in the Home app on iOS 14 and iPadOS 14

Apple occasionally offers updates for iOS, iPadOS, watchOS, tvOS and macOS as closed developer previews or public versions. While sticks contain new features, they also contain pre-release bugs that can prevent normal use of your iPhone, iPad, Apple Watch, Apple TV, or Mac and are not intended for everyday use on a primary device. That's why we recommend that you stay away from developer previews, unless you need them for software development and use public betas with caution. If it depends on your devices, wait for the final release.

Accessory-based automations are set in motion when a particular device, such as a light, undergoes a change. For example, you can create an automation that automatically shuts off a HomeKit ceiling fan in the living room when the lights go out.

But the best part is that these automations will work even if an accessory is changed by means of a physical switch on the wall, it is not limited to the periods when the Home or Siri application is used.

  1. Launch Home application.
  2. Press Automation.
  3. Click on Add button in the upper right corner of the screen (looks like an extra sign).

    How to create accessory automations in the Home app on iOS 14 on iPhone, showing steps: Launch the Home app, tap automation, tap the Add button

    Source: iMore

  4. touch An accessory is controlled.
  5. Select which Accessory the automation will start by pressing each.
  6. touch Next →.

    How to create accessory automations in the Home app on iOS 14 on iPhone, showing steps: Touch an accessory is controlled, select accessories, tap Next

    Source: iMore

  7. Choose the desire Accessory state pentru automatizare, cum ar fi Pornit, cu un robinet.
  8. Atingeți Timp și setați orele specifice pentru care doriți ca automatizarea să fie activă.
  9. Atingeți oameni pentru a stabili condițiile bazate pe locație pentru momentul automatizării.

    Cum să creați automatizări accesorii în aplicația Acasă pe iOS 14 de pe iPhone, arătând pași: Alegeți statul accesoriu, atingeți ora pentru setări suplimentare bazate pe timp, atingeți Persoane pentru setări suplimentare de locație

    Sursa: iMore

  10. Atingeți Următor →.
  11. Atingeți pe a Scenă or Accesorii pe care doriți să le controlați atunci când funcționează automatizarea.
  12. Atingeți Următor →.

    Cum se creează automatizări accesorii în aplicația Acasă pe iOS 14 de pe iPhone, arătând pași: atingeți Următorul, atingeți o scenă sau accesorii, atingeți Următorul

    Sursa: iMore

  13. Atingeți și țineți apăsat pe un Accesorii pentru a schimba starea țintă, cum ar fi luminozitatea sau oprirea / pornirea.
  14. Apasă pe X butonul când ați setat starea dorită.
  15. Atingeți Terminat.
    • Atingeți Opriți pentru a seta o oră pentru ca accesoriul să se oprească automat dacă doriți.
      Cum se creează automatizări accesorii în aplicația Acasă pe iOS 14 de pe iPhone, arătând pași: atingeți și țineți apăsat pe un accesoriu, atingeți butonul X când este setat starea dorită, atingeți Done

Cum se creează automatizări de senzori în aplicația Acasă pe iOS 14 și iPadOS 14

Apple oferă ocazional actualizări pentru iOS, iPadOS, watchOS, tvOS și macOS ca previzualizări închise ale dezvoltatorilor sau versiuni publice. În timp ce betele conțin funcții noi, ele conțin, de asemenea, bug-uri de pre-lansare care pot împiedica utilizarea normală a iPhone-ului, iPad-ului, Apple Watch, Apple TV sau Mac și nu sunt destinate utilizării zilnice pe un dispozitiv primar. De aceea, vă recomandăm cu siguranță să stați departe de previzualizările dezvoltatorilor, cu excepția cazului în care aveți nevoie de ele pentru dezvoltarea de software și de a utiliza versiunile publice cu precauție. Dacă depindeți de dispozitivele dvs., așteptați lansarea finală.

Automatizările bazate pe senzori, cum ar fi automatizările accesorii, intră în joc atunci când apare o schimbare în mediu. Automatizările pot fi create cu dispozitive HomeKit precum senzori de mișcare, senzori de calitate a aerului, senzori de contact, detectoare de fum / co și multe altele. Aceasta înseamnă că puteți avea un roșu aprins când calitatea aerului din casă face o scufundare sau când difuzorul redă un sunet de alarmă atunci când se deschide o fereastră.

Din păcate, automatizările senzorilor de temperatură și umiditate nu sunt disponibile până în prezent prin aplicația Home, dar dacă nu vă deranjează să faceți o scufundare mai profundă folosind o aplicație HomeKit terță parte, există și modalități de a le folosi.

  1. Lansați Aplicație pentru acasă.
  2. Apăsați pe Automatizare.
  3. Apasă pe Buton Adăugare în colțul din dreapta sus al ecranului (arată ca un semn în plus).

    Cum să creați automatizări de senzori în aplicația Acasă pe iOS 14 pe iPhone, arătând pași: Lansați aplicația Acasă, atingeți automatizare, atingeți butonul Adăugare

    Sursa: iMore

  4. Atingeți Un senzor detectează ceva.
  5. Selectați care Accesorii va începe automatizarea apăsând pe fiecare.
  6. Atingeți Următor →.

    Cum se creează automatizări de senzori în aplicația Acasă pe iOS 14 de pe iPhone, arătând pași: Atingeți un senzor detectează ceva, selectați accesorii, atingeți Următorul

    Sursa: iMore

  7. Alegeți dorința Statul accesoriu pentru automatizare, cum ar fi Pornit sau Deschide, cu un robinet.
  8. Atingeți Timp și setați orele specifice pentru care doriți ca automatizarea să fie activă.
  9. Atingeți oameni pentru a stabili condițiile bazate pe locație pentru momentul automatizării.

    Cum se creează automatizări de senzori în aplicația Acasă pe iOS 14 de pe iPhone, arătând pași: Alegeți statul accesoriu dorit, atingeți Ora pentru a seta setările bazate pe timp, atingeți Persoane pentru a seta setările bazate pe locație

    Sursa: iMore

  10. Atingeți Următor →.
  11. Atingeți pe a Scenă or Accesorii pe care doriți să le controlați atunci când funcționează automatizarea.
  12. Atingeți Următor →.

    Cum puteți crea automatizări de senzori în aplicația Acasă pe iOS 14 de pe iPhone, arătând pași: Apăsați Următorul, atingeți o scenă sau accesorii, atingeți Următorul

    Sursa: iMore

  13. Atingeți și țineți apăsat pe un Accesorii pentru a schimba starea țintă, cum ar fi luminozitatea sau oprirea / pornirea.
  14. Apasă pe X butonul când ați setat starea dorită.
  15. Atingeți Terminat.
    • Atingeți Opriți pentru a seta o oră pentru ca accesoriul să se oprească automat dacă doriți.
      Cum se creează automatizări de senzori în aplicația Acasă pe iOS 14 de pe iPhone, arătând pași: atingeți și țineți apăsat pe un accesoriu, atingeți butonul X când este setat starea dorită, atingeți Done

Ce automatizări utilizați?

Folosiți automatizări în casa dvs. HomeKit? Aveți câteva automatizări geniale pe care doriți să le partajați? Te-a inspirat ghidul pentru a începe? Aveți câteva întrebări sau aveți nevoie de ajutor? Spuneți-ne în comentariile de mai jos!

Best selling & Top trending HomeKit product in our shop at this moment

HomeKit.Blog is in no way affiliated with or endorsed by Apple Inc. or Apple related subsidiaries.

All images, videos and logos are the copyright of the respective rights holders, and this website does not claim ownership or copyright of the aforementioned.

All information about products mentioned on this site has been collected in good faith. However, the information relating to them, may not be 100% accurate, as we only rely on the information we are able to gather from the companies themselves or the resellers who stock these products, and therefore cannot be held responsible for any inaccuracies arising from the aforementioned sources, or any subsequent changes that are made that we have not been made aware of.

HomeKit.Blog Is A Participant In The Amazon Services LLC Associates Program, An Affiliate Advertising Program Designed To Provide A Means For Sites To Earn Advertising Fees By Advertising And Linking To Amazon Store (Amazon.com, Or Endless.com, MYHABIT.com, SmallParts.com, Or AmazonWireless.com).

The opinions expressed on this website by our contributors do not necessarily represent the views of the website owners. 

Copyright © 2022 HomeKit Blog
. All rights reserved
United States