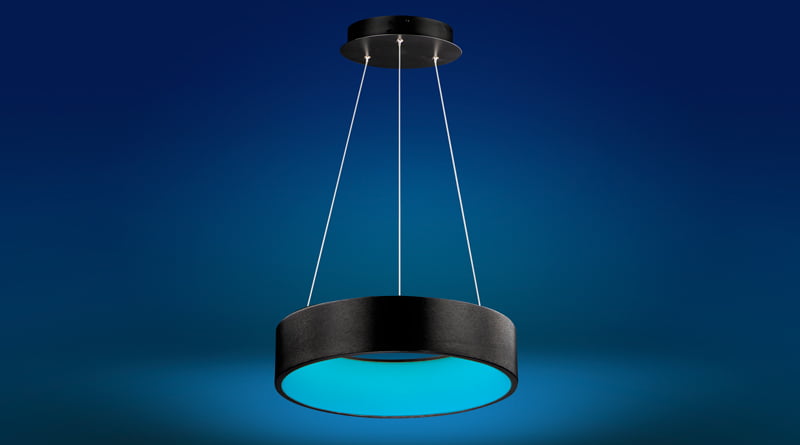
I purchased four ET2 lamps— three pendant lamps with one 24′′ pendant and two 17′′ pendant lamps with a 17′′ flush mount lamp for the fourth lamp. I've been looking for lights with this modern style for years. In the last few years, none of the lights I've seen had any smart connectivity or RGB capability. The bulbs I discovered had only one option of color and were very expensive, some of them exceeding $1000.00. These ET2 IQ lamps were the first to be seen and connected to this style, the RGB color. They are part of the' Friends of Hue' program as a reward and are consistent with HomeKit as such.
The 24′′ ET2 iQ Lamp Pendant (E31256-BBK) was ordered first. It was supplied from Southern California via UPS. There were no shipping issues, and within a few days the lamp arrived in the perfect condition.


My only criticism of packaging is that Styrofoam packaging is not eco friendly and a lot needs to be dealt with. The use of recyclable packaging while still providing the same security would be nice for ET2. I would have been happy to pay some extra dollars if I hadn't had to deal with all this Styrofoam. My trash comes once a week. It took me three weeks to finally get rid of all the Styrofoam. That was broken into little bits with the Styrofoam and mixed in with my other trash every day. I would have had to go to the dump and pay the disposal fee if I wanted to get rid of it all at once.
I purchased four lamps that came with the amount of packaging involved. Still, because that stuff doesn't biodegrade, I hate throwing out Styrofoam. In the recycling process, the boxes themselves are easily cut and disposed of. My only criticism of the packaging is the Styrofoam, but the sections of the lamp are well shielded.
The lamp and parts, two sheets of instructions, a small bag of standard hardware, including mounting screws, anchors, standard wire nuts and a pair of white cloth gloves to be used to protect the lamp during installation, were included when the components were unboxed. I suppose this was to avoid finger oils and prints from reaching the lamp finish, but the instructions did not mention white gloves. The four main parts of the pendant light. The large ring that is the main element of the lamp, the support cables, the mounting base and the mounting bracket. The three main elements are a flush-mount lamp. There are no hanging wires, just like the pendants.
The mounting base involves the' Friends Of Hue ' receiver and the LED processor module. Power enters the lamp in this module. LED energy and data is sent out of this module by one of the three support cables to the main lamp for pendant lamps. The support cables are very long so that the pendant lights can be installed on very high ceilings. I measured these cables at roughly 96′′, which is adequate for ceilings of up to two stories.
The fact that these lamps are of high quality was immediately obvious. The lamp is produced of aluminum, stainless steel, while the inner lens / diffuser is made of acrylic. I'm going to say that the aluminum and stainless steel finish are delicate and simple to scratch. ET2 includes the installation of white cloth gloves to protect the lamp finish during installation.
INSTALLATION DISCLAIMER
Note to any potential DIYers out there; this lamp is not designed as many Hue or other common lights are for typical DIY use. This lamp is designed only for qualified installers or those with significant installation experience. The rules include very basic installation points and do not include some of the techniques you need to know about to install this lamp. That's why I say it's for experienced / professional installers. To install them efficiently and safely, it is necessary to know how to install hanging ceiling lamps.
Hanging lamps are awkward to manage, especially if there is a considerable distance from the ceiling of the lamp. Because there are no cables, the flush mount is easier to install, but I would still recommend hiring a professional electrician if you haven't installed ceiling lamps before or are unsure about it.
I have significant knowledge of installing many different kinds of electrical devices in household applications, commercial installations, automotive and aircraft applications. I am an accredited FAA Air Frame and Power Plant Mechanic, and my rating for the US Navy was Aviation Electrician's Mate. I've been flying and fixing for 20 years now. At the same time, sometimes. Many times I have repaired autopilots and other flight systems, so simple household lighting does not generally pose a significant challenge to me. However, even with my understanding of how awkward it is to deal with hanging lights and how delicate these bulbs are, this setup was still a challenge for me.
The wiring is simple enough. I scratched one of the 17′′ pendant lights. It was a small scratch that was not really visible in stainless steel, except, of course, for me. If you're not comfortable dealing with mechanical / technical things or rarely / never dealing with the installation, removal or operation of electrical equipment, then I highly recommend you to call a qualified electrician to install this lamp safely and correctly. Compared to other HomeKit lamps, these lamps are expensive, so you don't want to attempt installing them and create a critical mistake that makes the lamp inoperative.
If you do not install the lamp yourself, you can skip the full installation assessment below and go straight to the assessment of the product. Most of you can truly do that right now, and if you decide to buy and install this light, you can save this post as a reference for that time.
PART 1A – PENDANT LAMP INSTALLATION
What I've come up with for me with this work is the following techniques. You may find better techniques than this, and if you feel so kindly free to share your techniques and ideas, I've always been willing to know some new things myself.
Determine the length of the support cables and modify the cables themselves is one of the first things that needs to be done. This is one of the most involved processes for this installation. There is no cable adjustment in the large part of the lamp or ring. All changes to the support cable are made within the mounting base. Each cable is individually tailored to allow simple mounting of the base on sloping ceilings. The inside of the mounting base has plenty of space when wrapped and mounted in a reasonable manner to accommodate all the excess cables. Very well planned!
The following is a discussion on the measurement and adjustment of cable length. There are two methods used to alter the length of the cable with two separate machines.
The first instrument is a plastic cable lock that was used to adjust the length of the cable first before installation. The second unit is a grommet with a spring-loaded cable lock that is used after the lamp has been installed for the second adjustment method. Before installation, I will discuss both methods so that you can know what is involved when you use the first method to adjust cable length and how precise you need to measure before installation.
There are three holes attached to the end of each support cable in the small plastic cable lock. It's very simple to use. Just walk through the three holes of the support cable, and that's enough to keep it in place.


The grommet is designed to lock the cable from the weight of the ring when the cable is tensioned.
The spring-loaded grommet allows you to simply push the cable to the base of the mount to shorten the length of the cable. It works as a single-way inspection valve. The cable can be pushed through the grommet to the mounting base and won't just slide back out. If you want to lengthen the cable by removing the excess cable from the mounting base, you need to move the grommet shaft up and down the grommet housing.

The spring-loaded design of the grommet allows you to fine-tune the cable length with the base fully installed. You don't have to take off the base to fine-tune the length of each cable as I did until I found out about the grommet design.
Just push the grommet center shaft into the mounting base and release the internal cable lock. The grommet shaft pushes the grommet housing around an eighth of an inch. You can extend the support cable to the other hand while holding the grommet shaft to one side by pulling the cable out. Keep in mind that only the amount of slack you left inside the base with the plastic lock can pull the cable out of it.
The photo above shows that I didn't leave any slack to stretch the cable, but you can still push the cable in and pull it back to level the loop, even without slackening. If you need to be precise with the height, it is best to use the grommet to leave a little slack with the lock tie to fine-tune the length of the cable.
It took me a while to figure out how the grommets work and to be able to fine-tune the length of the cable. This design was not included in the rules. I washed the base a few times to adjust the length of the cable before I knew how the grommets were working. Learned about the lesson. The grommes ' function was not included in the orders.
The plastic cable tie also functions as a backup if the grommet's internal lock fails or it stays in the unlocked position. It will prevent the cable from slipping all the way and at least partially prevent your lamp from falling.
I recommend that you use the grommet before installation to modify the length of the cable so that you can feel how the grommet operates and also make sure that the grommet operates without any issues.
The lamp is supplied with a fully extended support cord and is quite long. More than 96′′.
MEASURING
I used a tape measure and measured from the roof to get a rough idea of what height the ring was meant to be and how soon the ceiling was going to drop.

I used a 21′′ fall of the 24′′ pendant lamp that I installed with a 10-foot ceiling in my dining room. The ring is 4′′ tall, so it falls another 4′′ below the cable length. In total, that's about 8 ft off the floor.
You want to get the length as close as you can, so that you don't have to change as much when you use the grommets to change the cable. I recommend you attempt to be within an inch or two and use the grommet to leave enough slack in the plastic cable tie. If your first measurements are relatively close, you need to do about an inch of slack.
Once the mounting base is installed, the length can be fine-tuned by extending or retracting the support cable through the grommet. You may need to remove the mounting base and adjust the cable length using the cable lock connections for small changes that will not be a problem, but for larger adjustments. This will depend on how precise the height of your lamp is. It was good enough for me to be within a few inches of what I wanted, and all I had to do was level the ring.
Upon completion of your first readings and adjusting the support cables using the plastic tie, you are ready to hang the lamp.
The wiring is pretty standard. The 120 volt black wire, the neutral white wire and the bare ground. STOP, call a qualified electrician if you're not sure how this cable is connected. This is not an installation for you. That's why I'm not talking about basic home wiring. It's ordinary wiring for any ceiling lamp. Don't start right now if you haven't accomplished any of that. Call an electrician, and if you really want to install lamps or other electrical equipment, you'll get some guidance where teaching is safe so you're not going to kill yourself or anyone else.
Do you keep saying that? Okay, at your own danger, do this. Just make sure you power the circuit down before attempting to connect or disconnect any wires. Do I have to tell you this? If you haven't understood that before, go and hire a qualified electrician for your own sake.
Using two standard screws, the mounting bracket for the mounting base is installed on a standard ceiling junction box. The bracket has a lot of different mounting options and is one of the finest mounting systems I have installed. From the center round part of the mounting bracket there are three exterior supports extending sideways. The purpose of these outer supports is to assist with the ceiling junction box. The mounting base's diameter is larger than the ordinary ceiling junction box, so the mounting bracket is larger to fit it.
I used anchors and screws to mount two of the three exterior supports on the 24′′ pendant lamp that I hung in my dining room. For the third outer support, I used a sheetrock screw, as there was a wooden stud there. The bracket for mounting is very secure.
I didn't use the exterior supports on my two 17′′ pendant lamps that I hung in my bedroom. That's because I put these lamps on the roof's present recessed lights. I used the Home Depot recessed light adapters to convert the recessed' can' lamps into non-recessed ceiling lamps. These adapters provided very strong support so that the exterior support was not needed in my perspective, nor was there any place for the exterior mounts to be screwed into, as there was only vacant space where the 6′′ could be mounted.
Also the 17 "lamp at the front is brighter than the 24" pendant. The mounting base of the three hanging ET2 lamps is about eight inches in diameter, so the recessed lamp's former 6′′ holes can be nicely covered.
Upon installation of the mounting bracket, things get a little tricky. The lamp is awkward to handle because it hangs on the cables of the support. The lamp's main part can swing around and bang into things that will damage it. It's simple to do. I put one of the 17′′ pendant lamps with a small scratch, but that scratch is only visible if you look very close to it.
These lamps are delicate, as I said earlier, and require very careful handling. They can easily be scratched and dented. Especially when they swing around. I wrapped the entire lamp in a package to protect it while I was installing it for the 17′′ pendant with the 81′′ drop. This turned out to be a very nice method, as I couldn't maintain the ring and install the mounting base at the same time. I was alone at the top of a very large ladder. I minimized the handing ring movement, but the ladder I was on was still rubbing. Because of the protection I placed on the lamp, it was not scratched or damaged in any way. That worked so.

It makes it easier for somebody to help you hang a lamp. Depending on the location of the installation, this may not always be possible. For one of my 17 "hanging lights, the drop was 81 inches, because the ceiling was on the second floor, and the stairs from the first to the second floor had an open ceiling at that point. There's only room for one person on the ladder, which has been extended quite a lot. It's been the hardest and most dangerous installation for me.
See the window in the above image? The sill provided a strong tool and component base. On top of a large ladder, you're going to have to accommodate things like that.
The image below demonstrates the lamp hanging tools I used. The bottom piece is a wire coat hanger of 3′′ length that I bent at both ends into a hook. The other three are intended to align with the mounting bracket the base screw holes and then keep the base in a location to sustain the lamp's weight.

The hook encourages the lamp by providing a temporary lamp hanging place while connecting the wiring. Awl and screwdrivers are used to fit the mounting bracket's screw holes without damaging the threads. They hold the basis in place while I insert (not included) the long screws.

It will do a lot to get three long screws that fit into the foundation's three mounting bracket screw holes. These will help when the three short base screws included are inserted. You can use standard screws to mount any wall receptacle or transfer to wall junction boxes that have been found. Those top and bottom screws have matching and lengthy threads. More about using the following ones.
These techniques are not included in the rules, but some of them are common to any ceiling lamp that is hanging. You may have a better technique and better tools, but that's what I used to do to get you the idea.
Use the hook to sustain the lamp's weight while connecting the wiring. I put the hook in the screw hole of the mounting bracket and put the mounting base on the other end of the hook through one of the three holes of the screw. When the lamps are hanging, that's quite ordinary practice.
You can see in the images how well this works. At that point, the wire connection was easy.


The next job is to assist the mounting base with the mounting screw holes in the mounting bracket once the cables are attached and to guarantee that the mounting base is aligned. This can be very hard if, while attempting to thread one of the included screws for that purpose, you attempt to maintain the mounting base.
It will be very difficult to try to get a visual view of the position of the mounting screw while holding the weight of the lamp and then threading the mounting screw. The screw hole in the mounting bracket is the same precise color as the mounting base, making it very hard to see unless there is a bright light pointing straight into that hole so that you have a nice visual angle. Even if you manage to align the holes, it will only be for a short time as you hold the lamp's weight. The lamp has sufficient weight to make your hand unstable, so it's almost impossible to align.
This is a lesson I've learned in the past. It's the hard way of course.
One method you can use to get a stronger visual image of the alignment between the mounting base screw hole and the mounting bracket screw holes is to put a piece of light-colored paper on the mounting bracket screw hole. Light yellow or white masking tape or a bright-colored piece of electrical tape. Any color that contrasts with the base of the mounting should operate. Then just make sure that the screw hole is evident so that the tape does not fold the mounting threads. This will offer you a better image of the alignment of the hole.
You can do this before installing the ceiling mounting bracket. Practice fitting the mounting bracket and base with each other before installation to get an idea of fitting and alignment. This will make it simpler when the mounting bracket is on the roof. If you used light-colored tape, you'll see that the alignment of the screw hole is simpler to determine. I used the two tiny and thin screwdrivers and the awl to align the holes and keep the foundation in place.


The three included mounting screws are tiny and awkward, making it very hard to simply try and screw the mounting base into the mounting bracket. The awl and the screwdrivers are really helping out here. Just insert all three instruments into all three holes, and those holes will be pretty well aligned.
Now that the mounting base is in place and the weight of the lamp is supported by the three instruments inserted into the mounting screw holes, support the weight of the lamp with your side by holding one of the screw holes and then remove that tool from the screw hole.
To thread a hole that is empty now, use the longer screw. The longer screw is much easier to thread than the short screw, and better than the three tools, it maintains the base to the mounting bracket. The mounting base will be aligned laterally with the mounting bracket once you have two long screws in place.


So now you've got two lengthy threaded screws and a third hole tool.
Now you can simply remove one of the included brief screws from the remaining instrument and thread. Threading the brief screw will be much easier as the hole is mostly aligned. Just by increasing and reducing the foundation with your hand you have to change the vertical height slightly. Do not tighten any of the mounting screws completely until all three are threaded.
Use the included smaller screws to swap each of the remaining longer screws one by one. After all three of the mounting screws included are in, then tighten completely.
Once the base is secured and the mounting screws tightened, the lamp level is checked and any adjustments are made using the grommets as discussed above. The picture here demonstrates the 81′′ fall of the 17′′ pendant. It can fall to 96′′.
To determine the level, I used a tiny bubble level. To see the general level, I put the level in several places. Use the grommets as earlier described to adjust each cable length as required.
PART 1B – FLUSH MOUNT LAMP INSTALLATION


It's much easier to install the flush mount 17 "lamp. Just install the bracket for mounting, which is much bigger than the other bracket for mounting the pendant. Because of the lengthy stretch of the flush mount bracket arms, you will need to screw each arm into the roof using screw anchors or a sheet rock screw of adequate size if there is a stud there.
Hang the lamp as it does not have a foundation. Connect to the conventional wire. I used the same hook coat hanger tool that I used to hang the flush lamp for the pendant bulbs to connect the wiring.
I also used the same instruments that I used for the pendants to align the bracket mounting holes with the lamp mounting holes using the same processes. The diameter is much larger because there is no foundation, but it is the same operation. Full installation!
ADDING THE LAMPS TO THE PHILIPS HUE APP AND HOMEKIT
It's a very easy method. Just power the lamp and open the Philips Hue app as a Friends Of Hue lamp. If your HomeKit scheme already configures that app, all you need to do is add a fresh light. If you first need to set up Hue, go through that method and come back here.
Serial number: You'll need it.
Go to "Add A Light" and activate that feature once you have the Philips Hue app running. You will need the serial number of six characters that you have undoubtedly already seen on top of the primary lamp and inside the foundation. That serial number is also on the lamp's instructions. There's a tiny line of text on the Hue app's "Add A Light" page that's kind of obscure. It reads "Use Number Serial." You don't have to do that for most Hue lights, but you need to click on that choice for this light. Click on "Search" to add the serial number.


When the app discovers the lamp, the lamp will blink off and on. Usually this will take about ten seconds. If it's longer you're likely to have problems. Continue the process of setting up. The Hue app will automatically add the lamp to your current home kit and provide you with the choice of choosing which home and space you want the lamp in. If you use these choices, the next time you open the home app, you'll discover the lamp in the right home and space. If the home and space alternatives have not been selected then the lamp will appear in the default home and space. No large deal, just move it wherever you'd like.
The configuration is pretty easy. The only critical point is to treat the lamp's serial number as any Homekit code would. Protect it and don't lose it. I'd also use an app like HomePass or similar to back up the code. If the code is lost, it's going to be hard to get it back if you can get it back at all. The stickers on each lamp are great, but if they come off or fade and you lose the directions, if they return to factory default, the bulbs will efficiently brick and become stupid bulbs.
Save your HomeKit codes at all times. Consider doing otherwise as sacrilege. Ultimately, you will later thank yourself for doing that.
PART 2 – REVIEW OF THE ET2 LAMPS INSTALLEDSimply put, these are the Homekit lamps I have the brightest and most color-saturated. They are hands down in my HomeKit home the finest performing lights. They are the best from inclusion into HomeKit to reliability of attachment, to lighting efficiency.
I was wondering if I was going to need an additional light for my dining room table because I thought the 24′′ pendent was going to be mostly accent lighting, but when I turned that lamp to full brightness it was obvious that I wouldn't need anything else. It's so bright that it has to be turned down. For lunch, 50% is nice. The best setting to sit down at the table is too bright. So there were misplaced my worries. I have no other lights that are as bright.
These lights are the highest performing lights I have when it comes to dimming rates on the reverse hand of the brightness scale. Anyone who uses intelligent lights understands that when you get below about 10 percent brightness, the majority of lights are just about the same brightness as they switch off. Other lights have some problems when the brightness proportion is in the single digits.
However, there is a clear distinction in the ET2 light, it will visibly go down every 1% increase, down to 1%. I haven't seen it in intelligent lamps before. The output of all four ET2 lights is precisely the same.
In all colors, color performance is exceptional ; red, green, blue, orange, yellow, etc. All colors are genuine and highly saturated. In addition, all four of them match each other perfectly when adjusting the color of all four lights at once. Between them there's no noticeable distinction.
I have five downlights in my kitchen of the third generation Phillips Hue BR30 and four in the upper foyer. These Hue lights also have excellent color saturation (as opposed to previous Hue lights generation) and the color fidelity with the ET2 lights is ideal. They fit precisely for any color wheel position. I believe that to achieve this, the ET2 lamps must use the same LEDs and LED controllers as the Philips Hue lights. It was a happy accident if that was not deliberate.
I'd show color saturation pictures but my camera can't capture that. Whatever color I set the lamp to the camera demonstrates it as mostly white with some of the color reflections.
To date, connectivity of these lights is ideal. None of them have yet appeared as "No Answer." There have been no link problems since this update to this article. Now it's been more than two months.
The foyer is the room I designated for the three 17 "lamps from the ET2 and four downlights from the Hue BR30. On the same circuit they are all driven. I have a wall switch from Lutron Caseta to regulate the energy of the circuit. I never use intelligent bulbs or lamps with a dimmer. When the voltage falls using the dimmer feature, a dimmer can boil the circuit of a intelligent light or lamp. This is not going to be done by a HomeKit wall switch because it's just on and off. Dim it can not be dimmed and therefore harm the circuits.
I use twelve wall switches from Lutron Caseta to regulate energy throughout the house for intelligent bulbs or lights. These switches usually stay on all the moment, but sometimes when it becomes unresponsive you need to power a intelligent bulb or lamp cycle. With HomeKit regulated wall switches, you can do that when you're away from home. Moreover, most individuals have other family members to consider. Some of them will inevitably switch off the normal wall switch when they leave or at different other moments. Unless you have attached HomeKit switches such as the Lutron Caseta or the like, those intelligent bulbs will remain powered down until you get home and switch them on.
All this is eased by Lutron Caseta wall switches or other HomeKit wall switches.


I mounted and use two Hue Dimmer switches to regulate the foyer lights straight, including the ET2 lamps. This is in relation to the wall switch from Lutron Caseta. Because the intelligent dimmer is a Hue control tool, the hue downlights and ET2 lights in the foyer work flawlessly. Cycles through several preset color environments by pressing the authority on (top button) numerous times on the Hue Smart Dimmer. The color and brightness in the foyer match perfectly with all seven of the lights. With soft dimming to off or transition to on or color change, all the lights react precisely the same. The procedure has been performed very well.
Final note: these are not inexpensive light fixtures, but when you consider quality design, attention to detail, brightness and precision of color, not to mention compatibility with Hue and HomeKit, it is difficult not to love these lamps as long as you are prepared to spend.
 Aqara Temperature and Humidity Sensor Plus Aqara Water Leak Sensor, REQUIRES AQARA HUB, Zigbee Connection, For Remote Monitoring, Alarm System and Smart Home Automation
Original price was: $38.98.$34.99Current price is: $34.99.
 SensorPush HT.w Wireless Thermometer/Hygrometer Water-Resistant for iPhone/Android. USA Made Indoor/Outdoor Humidity/Temperature/Dewpoint/VPD Monitor/Logger. Smart Sensor with Alerts
$69.99
 meross Smart WiFi Table Lamp, Bedside Lamp, Compatible with Apple HomeKit, Siri, Amazon Alexa and SmartThings, Tunable White and Multi-Color, Touch Control, Voice and App Control
Original price was: $49.99.$39.99Current price is: $39.99.
HomeKit.Blog is in no way affiliated with or endorsed by Apple Inc. or Apple related subsidiaries.
All images, videos and logos are the copyright of the respective rights holders, and this website does not claim ownership or copyright of the aforementioned.
All information about products mentioned on this site has been collected in good faith. However, the information relating to them, may not be 100% accurate, as we only rely on the information we are able to gather from the companies themselves or the resellers who stock these products, and therefore cannot be held responsible for any inaccuracies arising from the aforementioned sources, or any subsequent changes that are made that we have not been made aware of.
HomeKit.Blog Is A Participant In The Amazon Services LLC Associates Program, An Affiliate Advertising Program Designed To Provide A Means For Sites To Earn Advertising Fees By Advertising And Linking To Amazon Store (Amazon.com, Or Endless.com, MYHABIT.com, SmallParts.com, Or AmazonWireless.com).
The opinions expressed on this website by our contributors do not necessarily represent the views of the website owners.