If you mention a new smart home device these days, chances are someone will ask "Is it Thread?" even if the device in question will never be able to function with Thread - like a video doorbell or security camera, for example. The appeal of this technology and its promises are so great that many have become somewhat "evangelical" about the subject. I myself am also excited and interested in all things Thread, although Zigbee is currently my 'go to' protocol, given the number of devices I have that use it (mostly Hue or Aqara), as well as its long and stable track record. Still, way back in the spring of 2021, when I was approached by OmniaBlinds about their upcoming products, asking if I would like to try out these blinds that would use Thread "Powered by EveMotionBlinds with HomeKit technology" I couldn't really say no! A series of delays delayed everything a few times, but Omnia kept their word and was able to deliver two sets of custom blinds to my home just in time for Christmas. No mean feat considering the time of year and the distance they had to travel - from Sweden to Taiwan.
Now that my blinds are installed, I'd like to show you why custom blinds might be worth the price (yes, I know I didn't pay, but still)And why the addition of Thread is the icing on the cake.
 111")
This is not the kind of product you pick up off the shelf, and so there is no retail packaging involved, although it is worth noting that since the company ships worldwide, you want your investment well protected. I am happy to say that everything arrived without any damage, and since the blinds I ordered were quite long, there was a greater chance that they would be bent. I shouldn't have worried, because they took every precaution to make sure that this kind of thing didn't happen.
 112")
In addition to the blinds themselves, you get a bag with the necessary attachments, shown above. Everything except an included USB cable and bracket connector is in pairs.
 113")
 114")
The most important parts are a pair of brackets to mount the blinds. You simply screw these to the wall or ceiling and the blinds snap into place. To hide the ugly screws, you also get two bracket covers to make everything look nice and "finished".
 115")
 116")
You only get one end cap (two shown here). This fits into the end of the blind tube where the motor is not, and snaps into place with the wall bracket. You also get what I describe as end caps which, like the bracket caps, give the whole thing a nice look.
 117")
 118")
Each set of blinds comes with a 3-meter USB-A to USB-C cable. This is for charging the internal battery, and is also used as part of the pairing process when first used.
 119")
An installation manual is also included in a selection of European languages - English, German, French, Dutch and Spanish. It is worth noting that this manual only describes the installation procedure after the blinds are assembled and ready to be installed in HomeKit. However, the installation of the blinds is very simple and does not really need any explanation, as long as you have the right tools.
 120")
 121")
One end of the blind contains the motor and an attached clip that snaps into place with the wall brackets. The design is exactly the same as the bracket connector shown earlier, but is part of the blind. The other end has an open hole where the bracket connector fits, so essentially both ends of the blinds have a clip connector.
 122")
 123")
The motor side of the blinds has a selection that contains the USB-C port for battery charging and initial pairing, along with a recessed button for resetting the blinds. There is also an LED that gives you the status of the blinds. In the middle of all this is a cord attached to a beaded chain and tassel that allows you to manually open or close the blinds if desired. One thing that has not been explained is the presence of two wires, which I can only assume are antennas for the Wire Radio in the tube.
 124")
 125")
While the chances of me manually opening or closing the blinds are pretty slim, the company makes clever use of the tassel by hiding the HomeKit code inside it. Pretty cool, although it's always wise to recommend backing up your codes, with myself (and indeed the Eve app) Aaron Pearce's excellent HomePass app.
 126")
 127")
I already mentioned that the assembly is very simple, but it pays to be prepared, especially if you have to mount two sets of blinds side by side, as was the case, because it's not going to look good if your blinds aren't straight or aren't at the same height. I used a laser device to make sure everything was aligned, and that really helped. As you can see, I attached the brackets to the wall and placed the cover plates on the brackets once they were in place.
 128")
In the image above, I installed one of the two blinds, and again the laser device really helped a lot. With the blinds in place, all that was left to do was install the end caps, and it was all set up in HomeKit.
 129")
Here you can see that the blinds are successfully attached to the wall to cover two very large sets of windows. This first photo is with the tin lamps on.
 130")
This is a picture of the blinds fully open again with the lights off.
 131")
You can see in the photo above the difference in light between the open and closed blinds. At this point I should point out that the blinds I requested were what you might describe as "transparent" or "see-through" blinds. The reason for this choice was quite simple. We live on the 16th floor and there are no buildings close enough to really cause privacy problems, so we like to have natural light coming in through the windows. The only problem is that it is hot and sunny most of the year, and sometimes the sun - which shines on these windows most of the day - can be blindingly bright. We already have a tinted coating on the windows, but that's not enough, so see-through blinds seemed like the best of both worlds. However, at the time we took these photos, the weather was gray and overcast - typical!
 132")
 133")
 134")
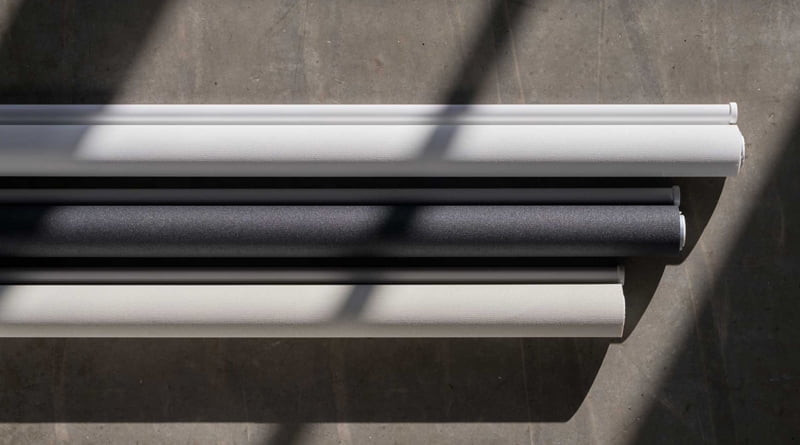
I should actually mention that when Omnia was about to send me the two sets of blinds for this review, they asked my preference, and I replied in a rather blasé manner that it didn't matter much to me, as long as the material was dark and translucent. I soon regretted that, because they insisted on sending me a sample pack of 27 different material samples, 9 of which were blackout blinds (which do not let light through), and the other 18 samples were all translucent. I was really impressed with not only the quality of the materials, but also the subtle, but obvious differences in the patterns and colors. I really should have known better. In the end, I chose Stockholm Black see-through blinds because they match the black of the window frames they cover, and I couldn't be happier, having been persuaded to take the samples to make my choice.
This brings me to an alternative for me in Taiwan, namely the Fyrtur smart blinds from Ikea. I haven't tried them out yet, so I can't give an opinion on their functionality or reliability. They are reasonably well priced, though. However, low prices come with a "price" in almost all cases, with Ikea offering only one choice of blackout or translucent blind material. On top of that, although they offer a variety of sizes, these are fixed, as are the lengths, so they are not 'made to measure'. The final point is that Ikea requires their hub for you to control their blinds and get them into HomeKit, along with a Zigbee repeater. Of course, you could argue that because Thread requires a border router, the Omnia blinds also require a hub. That's true to some extent, but while the HomePod Mini and the 2021 Apple TV include border routers, they are primarily audio speakers and entertainment hubs, respectively, with border router functionality thrown in. Add to that the fact that if you have more than one border router if one fails, the Blinds (or any Thread device) will simply connect to another working border router. This is not the case with the Ikea blinds or any Zigbee device for that matter, so when you start adding up what is offered by both custom blinds (exact sizes desired, large selection of materials and colors), the price starts to make sense. Finally, there are even more expensive smart blinds if you really want them, for example from Lutron.
 135")
 136")
 137")
Adding the blinds to HomeKit is as simple as adding almost any other device, although because the blinds have to go through a separate installation process, it's important to get it right, which in this case means setting them up via the Eve for HomeKit app. Before you do this, though, you'll need to put the blinds into pairing mode, which simply means plugging in power to the USB cable and connecting it to the blinds via the USB-C port.
 138")
 139")
Choose the room where they should go, and rename if necessary
So far so good...
 140")
 141")
 142")
Next, you need to calibrate the blinds, which is actually not as difficult as you might think.
 143")
 144")
 145")
Set the lower position or lower limit. The blinds will begin to unroll until you stop them. You can then adjust the position incrementally using the round buttons on the bottom half of the screen. Once satisfied, click confirm
 146")
 147")
 148")
The Home app, as you might suspect, offers pretty much the same as with all other smart blinds, and is very straightforward with one tile per set of blinds. A simple tap opens or closes them completely, depending on what position they are in at the time. A long press will give you access to the slider, which allows you to set specific opening or closing percentages. The settings section shows whether an obstruction has been detected (for example, a plant left on the shelf), along with battery levels and whether the battery is charging or not. Other than that, it's pretty "vanilla.
 149")
 150")
 151")
The Eve app offers a little more, for example on the main screen you get the tiles by default, and just like in the Home app a quick tap closes or opens the blinds. Similarly, long presses give you access to more settings. At the top of the main screen for the blinds is a scroll bar, although it's not as easy to use as the one in the Home app because of the difference in size. Below that is a Schedule section and some basic information about the device's status within the Thread network.
 152")
 153")
 154")
Below the slider for the blinds is a small button that provides access to log data for the blinds and usage. These logs are divided into months and days, with each day containing data on when the blinds were operated, and what position they were in. While this is welcome in some respects, I'm honestly not sure what the point of these logs is.
The Schedule section, as you might expect, is aimed at creating schedules for the blinds to open, close, or move to the preferred position if one has been set. The schedule can be based on a specific time and day, and can also be activated based on the local sunset or sunrise. The clever thing about these schedules is that they are stored "on-device," so if your entire HomeKit installation were to fail, these blinds would continue with these schedules regardless.
 155")
 156")
 157")
What I do like about the Eve app is that as long as you have at least one Thread-enabled Eve device, you get access to additional information about your Thread network. So in the second screenshot, you see two Nanoleaf devices, the Essentials lights, both using Thread. Below that, you see the Eve Energy smart plug, which is labeled Fan, because it controls a fan. Below that you see both blinds, and separately at the bottom are three Thread edge routers, which are my three HomePod Minis. To be absolutely sure that the blinds are using Thread, you can click on the item to get more Thread details.
 158")
 159")
 160")
 161")
A final barely noticed feature is called Migration measurements. This allows the settings for one set of blinds to be migrated to another set, eliminating the need to try to get both sets of blinds equal for both the top and bottom positions, so you just set one set, migrate those settings to the other set, and they will match.
I have to admit that I haven't had these blinds long enough to figure out if there are any particular idiosyncrasies, although I have done my best to find some, and so far haven't found anything significant. When I first set up the second of the two blinds, the app could not connect to the blinds when I got to the calibration procedure after installation, so I initially skipped the setup, and returned to it after a few minutes, by which time there was connection again. However, after the blind was configured, I noticed that it was not connected to Thread, but to Bluetooth. I decided to wait and see if it would connect to my Thread network, but it didn't, so I ended up just removing the blind from HomeKit, manually resetting the blinds and adding it again, which thankfully solved the problem. Personally, I didn't worry too much about this, because I've experienced enough strange behavior from all sorts of HomeKit devices to know that these things can generally be fixed somehow. Since I haven't had the blinds for that long, I also can't attest to the battery life, which the company says should last a year on average between charges, although I opened and closed the blinds quite often in the first few days. But after a few days of use, both blinds are still at 100%. I actually expected to have to charge the batteries as soon as they arrived, but they were fully charged. I guess these units are still so new that they haven't been sitting on a shelf for that long.
Speaking of the batteries, the company claims that the batteries used are designed to last 300 charge cycles. If this is true, you can expect these batteries to last longer than the blinds, you as the owner and a few of your descendants! Even if the numbers were exaggerated, and the battery only lasted 3 months before needing to be recharged, that's still 75 years of battery life! Personally, I would be happy with a 15-20 year life span, as long as the battery lasts a full year between charges, with average use.
 163")
Retrofit devices definitely fill a need for people on a budget or for people who are satisfied with their existing blinds, so in many ways a comparison is unfair because they are different devices. Omnia's offering, of course, covers the whole package, so if you have the budget and don't already have blinds, the Omnia could be the perfect balance between cost and customization. The Aqara E1 has served me well so far, and I have no complaints. It's also a lot easier to install, since the difficult part of mounting the blinds is not part of the equation. That said, there's nothing like smart blinds that don't even hint at the technology involved, which you can't really say about devices like the Aqara E1, because it's relatively large, and it's attached to your wall in full view of anyone who happens to be looking at the window and blinds it's being used for.
As far as noise goes, my rather unscientific tests (in the full video) show that the Omnia blinds are really quite quiet, but it also highlights what a good job Aqara has done in keeping noise levels down as well. If I had used the Soma Smart Shades 2 as a test, it would not be the same story, as they are really quite noisy in comparison.
It's a bit of a cliché, but you generally get what you pay for, and this applies as much to Omnia Blinds as anything else. The company prides itself on the materials used, and the way they are manufactured with environmental protection in mind, so if like me you find this important, then the extra cost, combined with the custom options open to you, make perfect sense. Still, while the last two products I reviewed are on the pricier side - the Thinka Z-Wave Gateway for HomeKit and the Homam 64GB Smart Camera - in the case of these blinds, the price is a lot more justified I'd say. Of course, the question remains whether I would buy them if I hadn't been sent them. The answer would be a resounding yes - but only if I had the money for it. In reality, I may have paid for a single set of blinds for our bedroom because the windows covered by the Omnia blinds are quite wide, which of course drives up the price, not to mention the fact that two sets of blinds were needed. Maybe when I have a little more money and the Aqara E1 takes the plunge, I'll invest in some more Omnia products. Until then, I think you just have to decide if you can indulge yourself. I think you should!
Full disclosure: OmniaBlinds provided HomeKit News with two complete sets of Smart Blinds for the purpose of this review. No other compensation was given, requested or in any way influenced our opinion of this product.
 165")
Pros
 Aqara Temperature and Humidity Sensor Plus Aqara Hub M2, Zigbee Connection, for Remote Monitoring and Smart Home Automation, Wireless Thermometer Hygrometer, Compatible with Apple HomeKit, Alexa
Original price was: $83.98.$72.99Current price is: $72.99.
 Kasa Smart Plug HS103P3, Smart Home Wi-Fi Outlet Works with Alexa, Echo, Google Home & IFTTT, No Hub Required, Remote Control,15 Amp,UL Certified, 3-Pack , White
Original price was: $24.99.$19.99Current price is: $19.99.
 eufy Security, eufyCam 2 Wireless Home Security Add-on Camera, Requires HomeBase 2 or HomeBase, 365-Day Battery Life, HomeKit Compatibility, HD 1080p, No Monthly Fee
HomeKit.Blog is in no way affiliated with or endorsed by Apple Inc. or Apple related subsidiaries.
All images, videos and logos are the copyright of the respective rights holders, and this website does not claim ownership or copyright of the aforementioned.
All information about products mentioned on this site has been collected in good faith. However, the information relating to them, may not be 100% accurate, as we only rely on the information we are able to gather from the companies themselves or the resellers who stock these products, and therefore cannot be held responsible for any inaccuracies arising from the aforementioned sources, or any subsequent changes that are made that we have not been made aware of.
HomeKit.Blog Is A Participant In The Amazon Services LLC Associates Program, An Affiliate Advertising Program Designed To Provide A Means For Sites To Earn Advertising Fees By Advertising And Linking To Amazon Store (Amazon.com, Or Endless.com, MYHABIT.com, SmallParts.com, Or AmazonWireless.com).
The opinions expressed on this website by our contributors do not necessarily represent the views of the website owners.

